6. Protecting DCs as Virtual Machines
When a server is created as a
VM instead of being installed on a physical computer, it becomes
nothing more than a set of files on a disk because the disk drives for
the computer are hosted in virtual hard drives. DCs running both AD DS
and DNS are ideal candidates for virtualization on Hyper-V because they
focus on providing a single, network-oriented service. When a machine is
virtual, it becomes much easier to protect it, restore it, and
otherwise manipulate it. Note, however, that even if the DC is a virtual
machine, it should be protected with traditional approaches just as if
it were a physical DC. This means backing up the System State on a
regular basis. If the machine fails, restore it like you would any other
DC.
Note:
MORE INFO PROTECTING DCS AS VIRTUAL MACHINES
For more information on how to protect a DC in a virtual machine, go to http://technet.microsoft.com/en-us/library/dd363545%28WS.10%29.aspx.
6.1. Practice Working with the AD DS Database
6.1.1. Practice Working with the AD DS Database
In this practice, you work with
a variety of utilities to protect and manage the AD DS database. First
you generate a backup of directory data, and then you use this backup to
create a new DC, using offline data to speed the process and reduce
replication over the network. You work with the AD DS database to
perform a manual defragmentation and compaction and then automate the
process. Finally, you rely on the Group Policy Management Console (GPMC)
to protect Group Policy objects.
EXERCISE 1 Use Ntdsutil.exe to Capture System State Data
In this exercise, you use the Ntdsutil.exe command to capture the data required to perform an installation from media for a DC.
Log on to SERVER10 with the domain administrator account.
Verify that this server includes a formatted D drive, and create a folder named IFM on this drive.
Launch an elevated command prompt by right-clicking Command Prompt on the Start menu and clicking Run As Administrator.
Type the following commands:
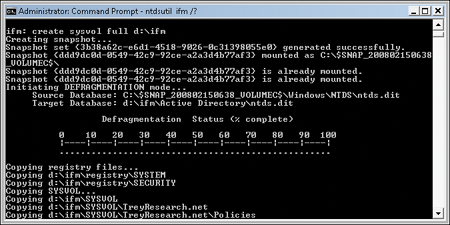
ntdsutil
activate instance NTDS
ifm
create sysvol full d:\ifm
The system displays a
Creating Snapshot message while the operation is in progress and then
lists a series of other information as it completes the operation. Note
that the system defragments the newly captured snapshot.
Use Windows Explorer to view the results of the snapshot you created with Ntdusutil.exe.
Share the IFM folder by right-clicking the folder, pointing to Share With, and clicking Specific People.
In the drop-down list, choose Everyone; click Add, and then assign Read/Write permissions in the Permission Level column.
Click Share to create the share.
Click Done.
Your IFM data is now ready to use to stage a new DC.
EXERCISE 2 Create a DC from Backup Data
In this exercise, you install a new DC in the treyresearch.net domain, using IFM data.
Log on to SERVER 11 with the local administrator account.
Launch Windows Explorer, and create a new folder on the C drive called IFM.
In the Windows Explorer address bar, type \\server10\ifm and press Enter.
If the credentials dialog box appears, type TreyResearch\Administrator or its equivalent and the required password.
If
you use the same account name and password on both servers, even though
SERVER11 is not a member of the domain, you will not be prompted for
credentials because of pass-through authentication.
Copy the entire contents from the IFM folder on SERVER10 to the C:\IFM folder on SERVER11.
Verify that all items have been copied.
Install the Active Directory Domain Services role. In Server Manager, right-click the Roles node and click Add Roles.
Review the Before You Begin page of the wizard and click Next.
On
the Select Server Roles page of the Add Roles Wizard, select Active
Directory Domain Services, click Add Required Features, and then click
Next.
On the Active Directory Domain Services page, review the information and click Next.
Review your choices and click Install.
Examine the installation results and click Close. Your installation is complete.
Click the Active Directory Domain Services node in Server Manager.
Click Run The Active Directory Domain Services Installation Wizard in the details pane.
This launches the Active Directory Domain Services Installation Wizard.
Select the Use Advanced Mode Installation check box and click Next.
You need this option to install from media.
On the Operating System Compatibility page, review the information and click Next.
On
the Choose A Deployment Configuration page, choose Existing Forest,
select Add A Domain Controller To An Existing Domain, and click Next.
On the Network Credentials page, type treyresearch.net.
Because
you logged on locally to the server and this account does not have
access rights to the treyresearch.net domain, you must provide alternate
credentials.
Click Set. Type treyresearch.net\Administrator or the equivalent account name and add the password. Click OK, and then click Next.
On the Select A Domain page, click treyresearch.net (forest root domain) and click Next.
On the Select A Site page, accept the default and click Next.
This page also appears because you are running the wizard in advanced mode.
On the Additional Domain Controller Options page, verify that DNS Server and Global Catalog are both selected and click Next.
If you did not assign a static IP address, the AD DS Active Directory Domain Services Installation Wizard gives you a warning because you are using a dynamic IP Address.
Click the Yes, The Computer Will Use An IP Address Automatically Assigned By A DHCP Server (Not Recommended) option.
The wizard warns you that it cannot create a delegation for the domain.
On the Install From Media page, click Replicate Data From Media At The Following Location, type C:\IFM or click Browse to locate the IFM folder on the C drive, and click Next.
Note
that the wizard indicates that the media must have been created from a
writable DC because you did not select the RODC mode for this DC.
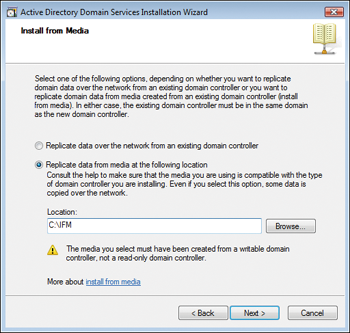
On the Source Domain Controller page, accept the defaults and click Next.
On the Location For Database, Log Files, And SYSVOL page, accept the default locations and click Next.
Type a strong password, confirm it, and click Next.
Confirm your settings on the Summary page and click Next. Select Reboot On Completion and wait for the operation to complete.
Your
new DC has been created from local media. This reduces replication and
then updates the data through replication after the DC has been created.
EXERCISE 3 Perform Database Maintenance
In this exercise,
you perform interactive database maintenance, using the restartable
Active Directory Domain Services mode. You can perform this operation
now because there are two DCs in the treyresearch.net domain. You must
have at least two DCs to use restartable AD DS.
Log on to SERVER11 with the domain administrator account.
Use Windows Explorer to create a C:\Temp and a C:\OrignalNTDS folder.
You use these folders as temporary locations for the compacted and original databases.
In Server Manager, expand the Configuration node and click Services.
Locate the Active Directory Domain Services service (it should be first on the list), right-click it, and click Stop.
In the Stop Other Services dialog box, click Yes.
The server stops the service.
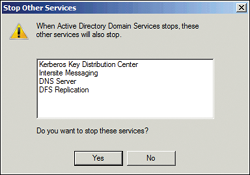
Remember
that if the service cannot contact another writable DC, it cannot stop;
otherwise, no one would be able to log on to the domain.
Launch an elevated command prompt by right-clicking Command Prompt on the Start menu and clicking Run As Administrator.
Begin by compacting the database. Type the following commands:
ntdsutil
activate instance NTDS
files
compact to C:\temp
The Ntdsutil.exe utility
compacts the database and copies it to the new location. In very large
directories, this operation can take some time.
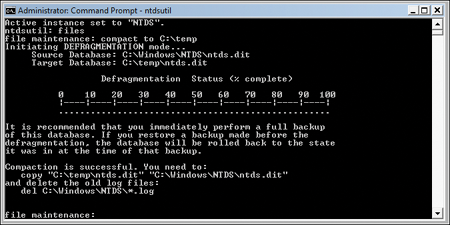
Type the following after the compaction operation is complete:
quit
quit
Delete all the log files. Type the following:
cd %systemroot%\ntds
del *.log
You delete the log files
because you will be replacing the Ntds.dit file with the newly compacted
file, and the existing log files will not work with the newly compacted
database.
Back up the Ntds.dit file to protect it in case something goes wrong. Type the following:
copy ntds.dit \originalntds
Copy
the newly compacted database back to the NTDS folder. To do so, make
sure you are still within the %SystemRoot%\NTDS folder and type the
following:
copy c:\temp\ntds.dit
y
Verify
the integrity of the new Ntds.dit file, and then perform a semantic
database analysis to verify the data within the database. To do so, type
the following:
ntdsutil
activate instance NTDS
files
integrity
quit
semantic database analysis
go fixup
quit
quit
Note that if the
integrity check fails, you must recopy the original Ntds.dit back to
this folder because the newly compacted file is corrupt. If you do not
do so, your DC will no longer be operational.
Return to Server Manager, expand the Configuration node, and click Services.
Locate the Active Directory Domain Services service (it should be first on the list), right-click it, and click Start.
Your
server is back online and ready to deliver authentication services to
the network. It can take several minutes for the dependent services to
restart. Delete the Ntds.dit located in the Original NTDS folder because
it is no longer valid. You can also empty the Temp folder.
EXERCISE 4 Automate Database Maintenance
You can script the entire
database compaction operation from the command line if you want to
automate it. You should, however, make sure that all the operational
results are captured in a text file so that you can review them if
something goes wrong.
Log on to SERVER11 with the domain administrator account.
Make sure both a C:\Temp folder and a C:\originalntds folder exist on your server and that both folders are empty.
You use the C:\Temp folder as a temporary location for the compacted database. You are ready to automate the compaction process.
Move to the C:\Temp folder, right-click in the details pane, and click New; then click Text Document.
Name the text document Compaction.cmd.
If
you cannot see the .txt extension of the file, in Windows Explorer,
click Folder And Search Options on the Organize menu. On the View tab,
clear Hide Extensions For Known File Types and click OK. Remove the .txt
extension on your file name. Confirm the name change.
Right-click Compaction.cmd and click Edit. Type the following commands:
del C:\temp\*.dit
del C:\originalntds\*.dit
net stop ntds /y
ntdsutil "activate instance NTDS" files "compact to C:\temp" quit quit
cd \windows\ntds
del *.log
copy ntds.dit \originalntds
del ntds.dit
copy c:\temp\ntds.dit
ntdsutil "activate instance NTDS" files integrity quit
   "semantic database analysis" "go fixup" quit quit
net start ntds
Save and close the Compaction.cmd file.
Note
that you can add a pause command after each command in your text file
to verify the proper operation of the commands while testing.
Test
the file by launching an elevated command prompt by right-clicking
Command Prompt on the Start menu and clicking Run As Administrator.
If at any time the file does not work, use Ctrl+C to cancel the batch file and correct the errors.
If the file works properly, you can use it to automate the compaction process.
Remove any pause statements you entered in the file and save it again.
You
can reuse this command file each time you want to run the compaction on
your systems. It is recommended that you run this command file
interactively to address any errors or issues during the process. Be
very wary of putting this file into a scheduled task. You should never
run compaction in unattended mode because errors could destroy your DC.
If a DC is nonfunctioning, you can use the following command to remove the DC role:
dcpromo /forceremoval
Run the Active
Directory Domain Services Installation Wizard again to re-create the DC.
Perform the Ntds.dit compaction operation at least once a month.
EXERCISE 5 Protect Group Policy Objects
In this exercise, you use the GPMC to back up GPOs.
Log on to SERVER11 with the domain administrator account.
Verify the existence of a folder named Temp on the C drive.
Launch the Group Policy Management console from the Administrative Tools program group.
Expand Forest\Domains\treyresearch.net\Group Policy Objects.
Right-click Group Policy Objects and click Back Up All.
Type the location as C:\Temp or use the Browse button to locate the folder.
Type a description, in this case First GPO Backup, and click Back Up.
The GPO backup tool shows the progress of the backup.
Click OK after the backup is complete.
Your GPOs are now protected.
Back up the Temp folder.
You can rely on this folder to copy the GPOs from one domain to another. Perform this operation at least once a week.